Tutorial ini merupakan modifikasi atau pengembangan dari tutorial "Bermain Lampu Animasi Addressable LED Strip WS2812 Efek Meteor dengan FastLED Arduino" yang artinya di sini kita masih bermain-main dengan lampu addressable LED strip WS2812, tapi permainan menjadi lebih menarik lagi karena pergantian efek-efek animasinya bisa kita ganti sesuka hati melalui halaman web.
Sebenarnya apa yang saya lakukan di sini adalah memodifikasi source code dari tutorial "ESP8266, WebSockets and WS2812B LEDs" yaitu dengan merubah list efek animasinya berdasarkan efek animasi yang ada di sini
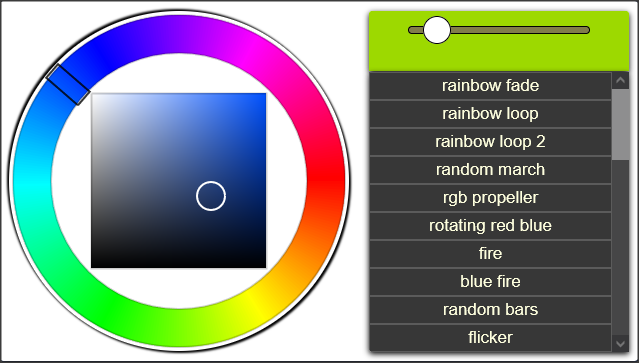
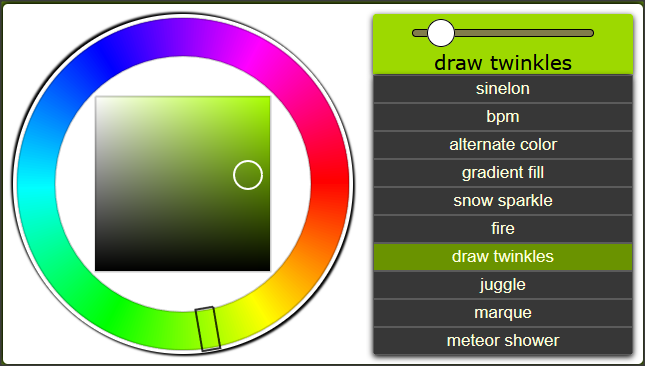
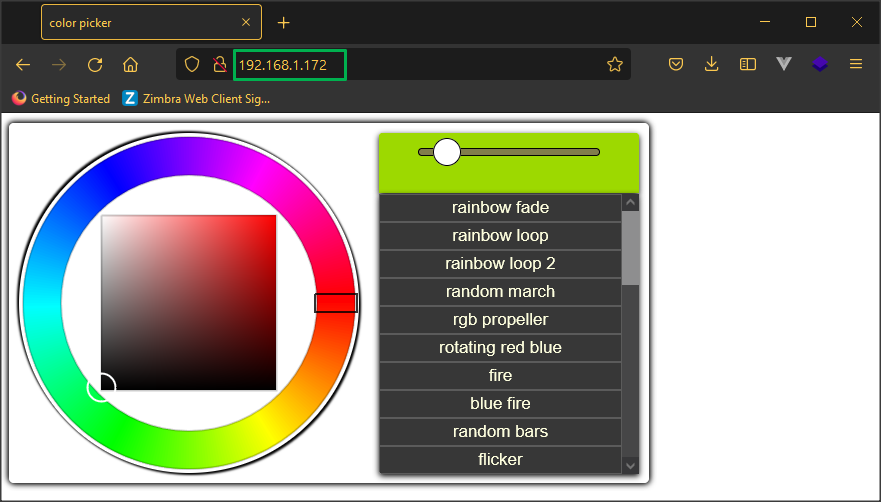
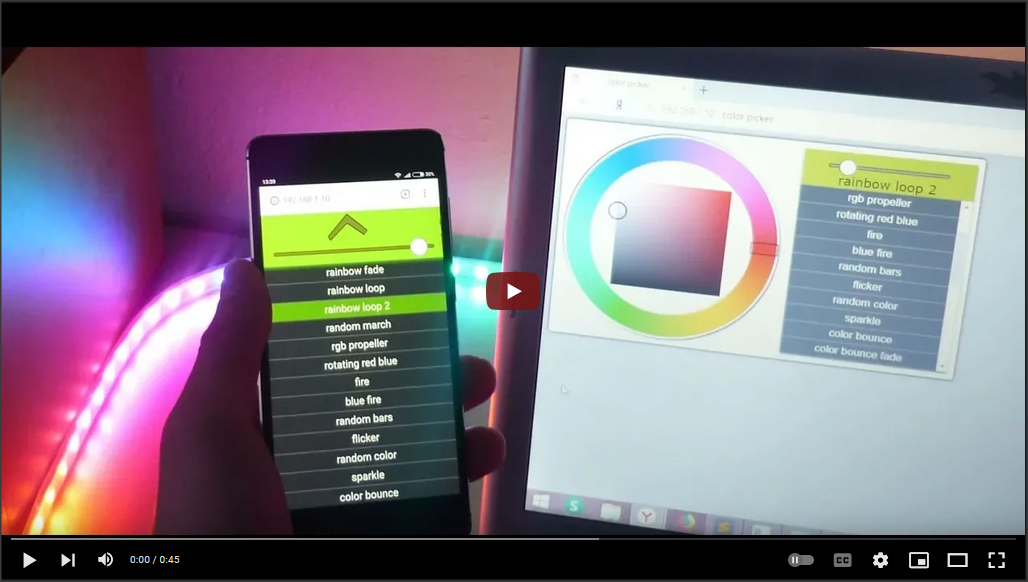
Kedua gambar di atas merupakan tampilan halaman web untuk mengontrol efek animasi dari LED Strip WS2812, yang di sebelah kiri adalah halaman web dari source code aslinya sedangkan yang di sebelah kanan adalah halaman web yang sudah saya ubah list animasinya. Secara umum halaman web yang berfungsi sebagai controller animasi ini terdiri dari 3 bagian yaitu: colour picker, brightness slider dan list animasi. Colour picker untuk merubah warna seluruh led berdasarkan warna yang kita pilih, brightness slider untuk mengatur tingkat kecerahan led dan list animasi untuk menggonta-ganti efek-efek animasi.
1. Langkah Persiapan
1.1 Hardware
1. Jaringan Wi-Fi
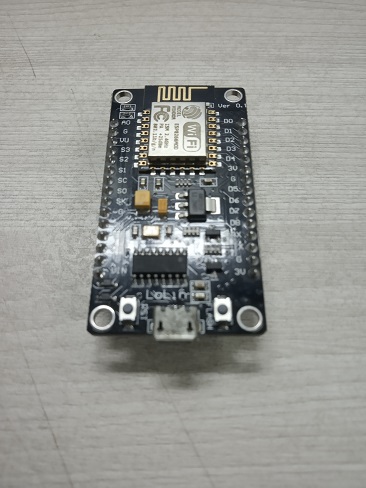
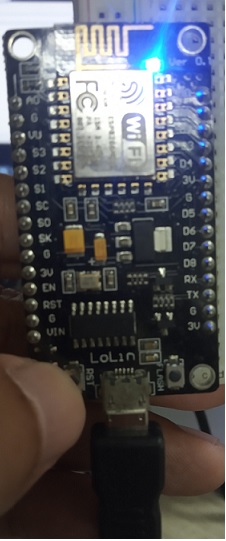
2. Lolin NodeMCU V3
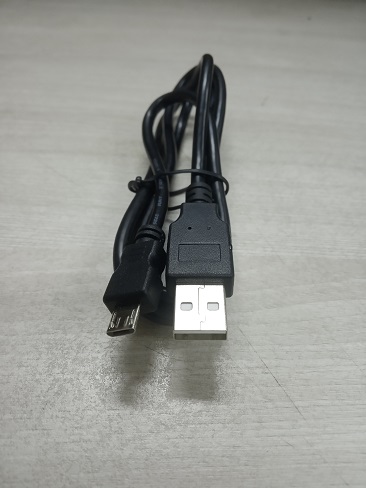
3. Kabel micro USB
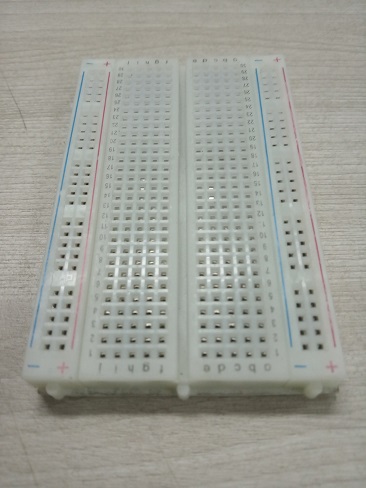
4. Breadboard
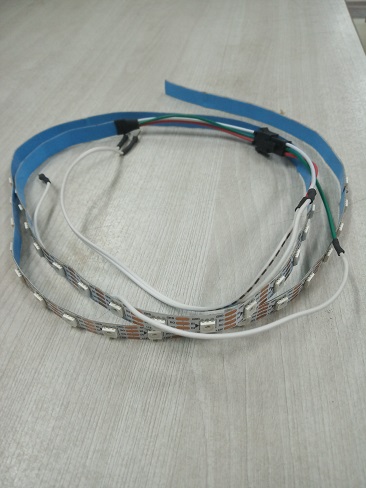
5. WS2812 12 Volt, 60 LED
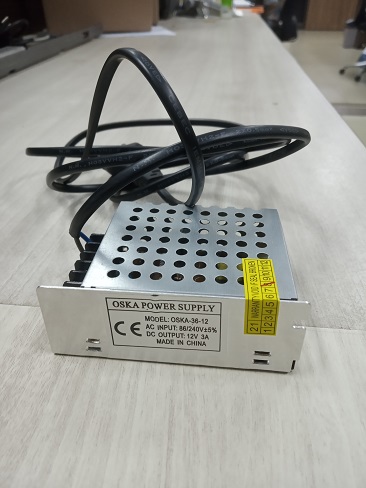
6. Adaptor 12V 3A
7. Kabel Jumper
1.2 Install Board & Library di Arduino IDE
-
Install board ESP8266
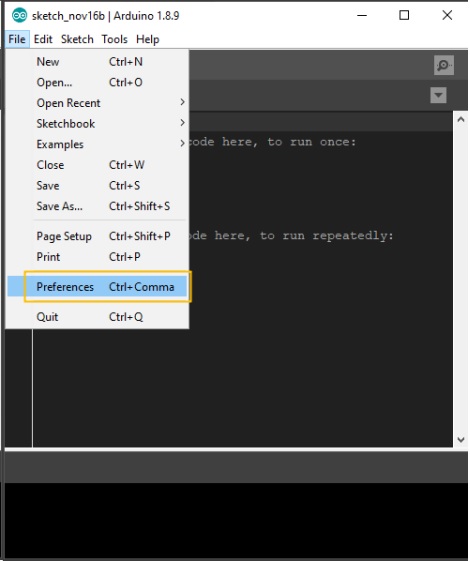
- Buka File Preferences di Arduino IDE
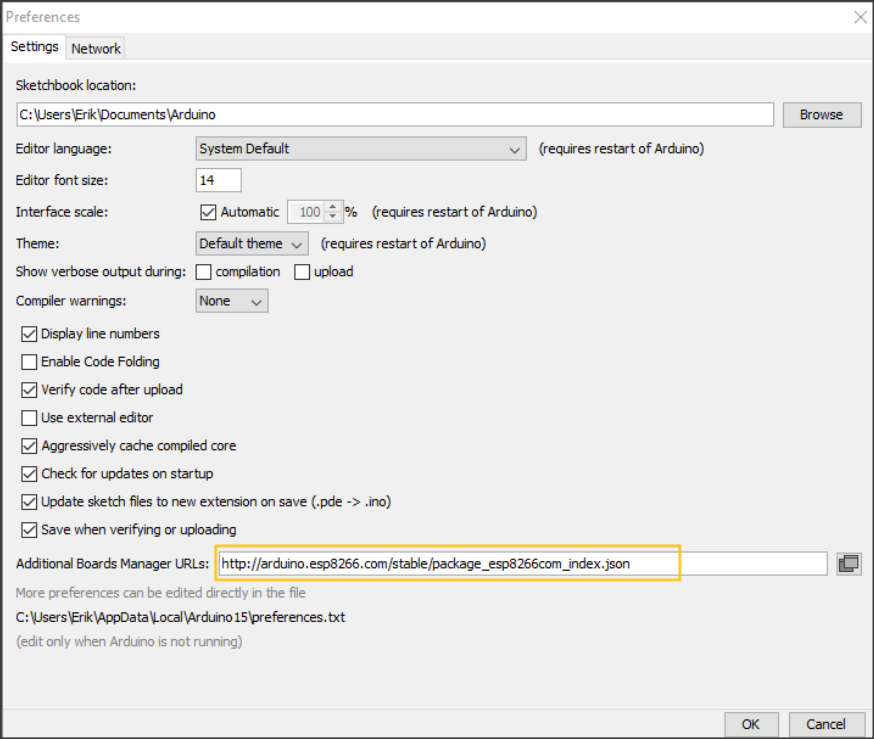
- Copy link http://arduino.esp8266.com/stable/package_esp8266com_index.json kemudian paste ke dalam text box Additional Boards Manager URLs. Klik tombol OK untuk menutup dialog Preferences.
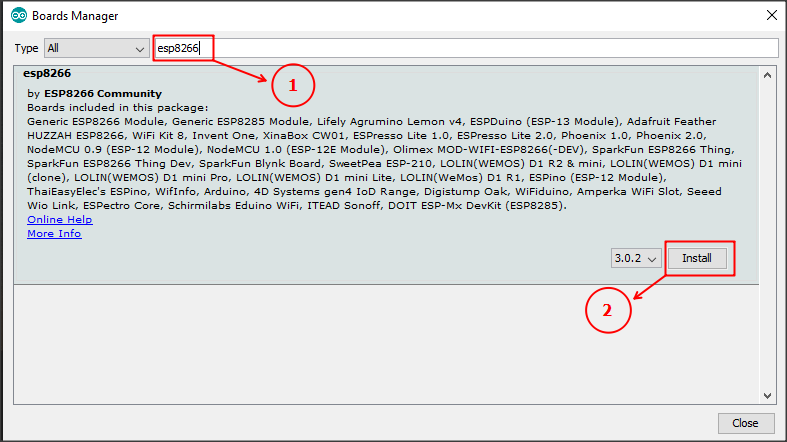
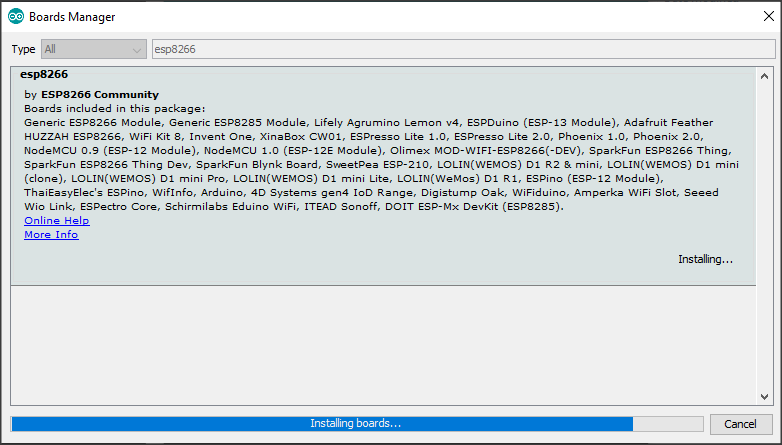
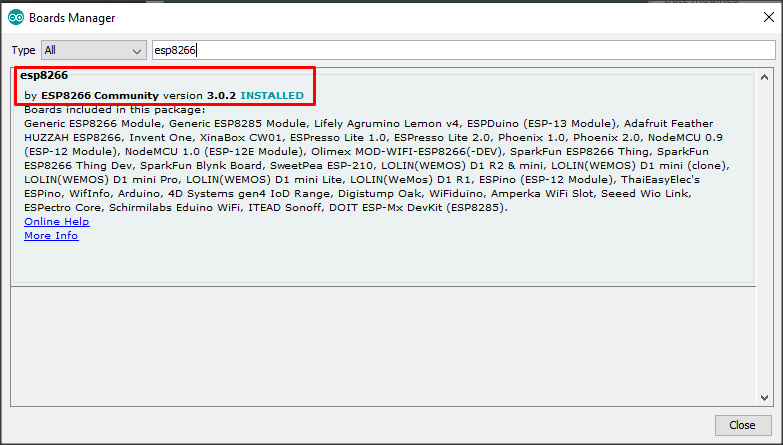
- Buka Boards Manager melalui Tools Board Boards Manager, kemudian ketikkan esp8266 pada text box maka akan tampil package esp8266. Klik tombol Install dan tunggu sampai proses instalasi package esp8266 selesai.

-
Install library WebSocket
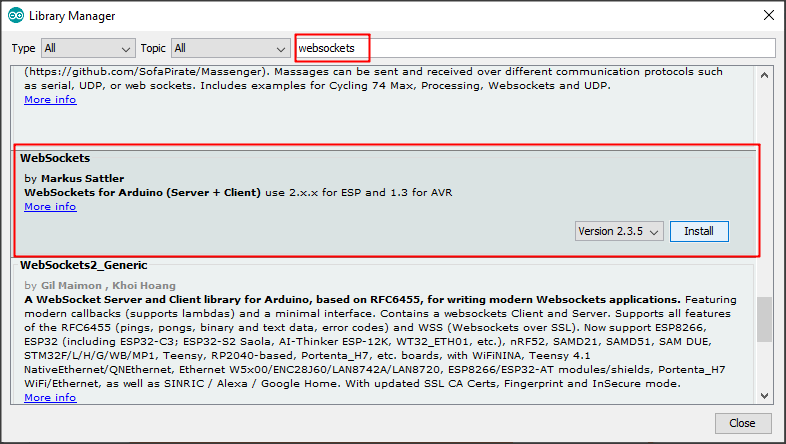
Buka Library Manager melalui Tools Manage Libraries... , ketikkan websockets pada text box maka akan tampil library-library untuk WebSockets. Pilih library WebSockets by Markus Sattler, kemudian klik tombol Install.
-
Install library FastLED
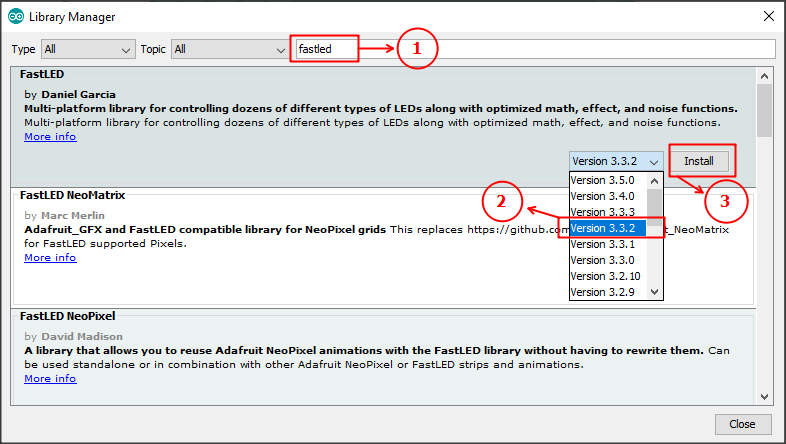
Buka Library Manager melalui Tools Manage Libraries... , ketikkan fastled pada text box maka akan tampil package FastLED by Daneil Garcia. Pilih Version 3.3.2 kemudian klik tombol Install.
2. Instruksi Dari Creator
Seperti yang sudah disebutkan di atas, bahwa project ini merupakan modifikasi dari project "ESP8266, WebSockets and WS2812B LEDs" maka kita harus mengikuti instruksinya.
-
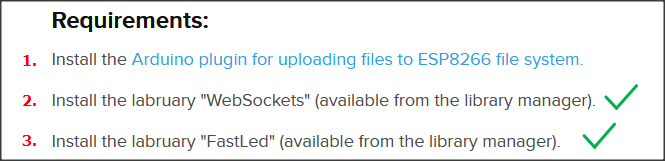
Install Plugins
Dari requirements di bawah ini, nomor 1 kita harus install plugins di Arduino IDE yang berfungsi untuk meng-upload file ke ESP8266 sedangkan nomor 2 dan 3 sudah kita lakukan sebelum ini.
Jika kita klik linknya maka kita akan menuju laman github. Perhatikan panduan instalasi di README nya
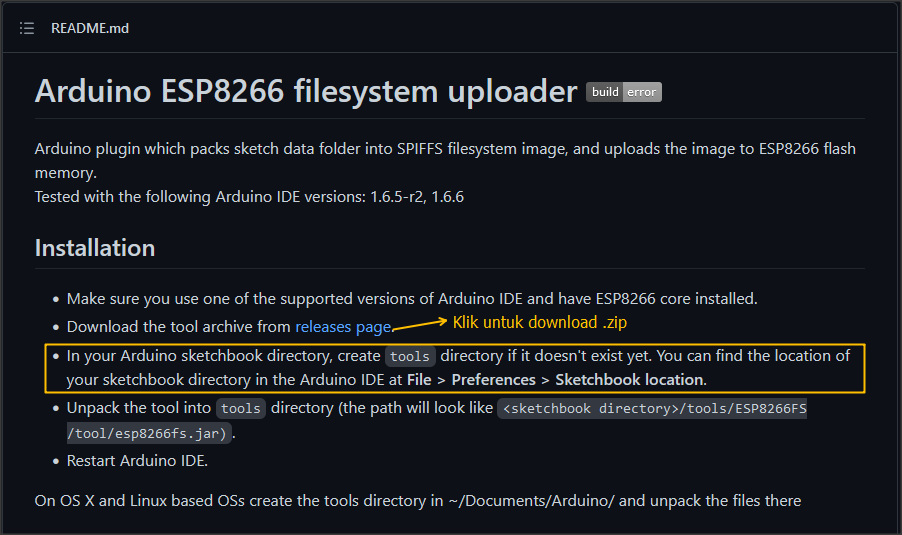
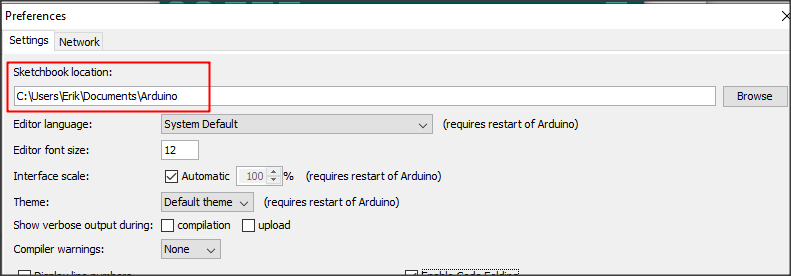
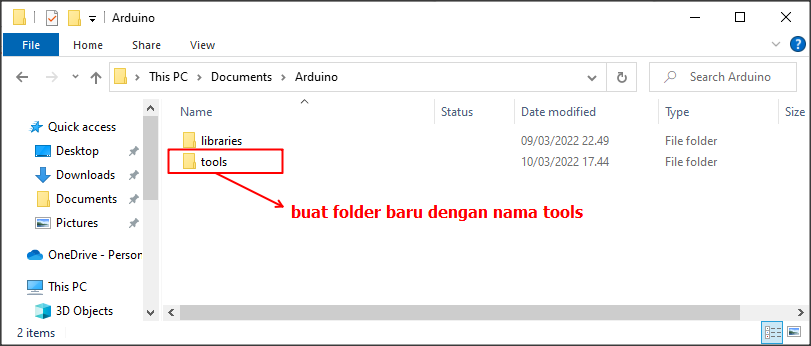
Setelah plugins selesai didownload, buat folder baru dengan nama "tools" di directory dimana sketchbook location berada. Bisa dilihat melalui File Preferences di Arduino IDE.
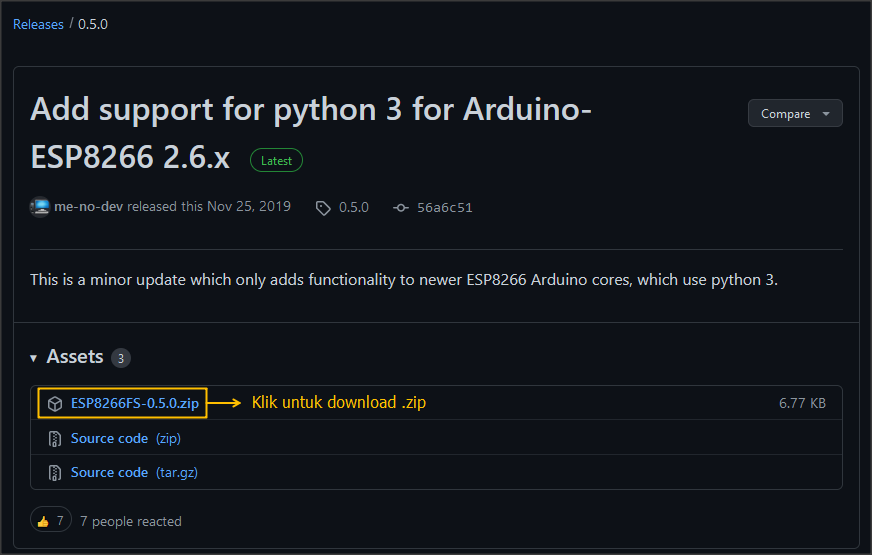
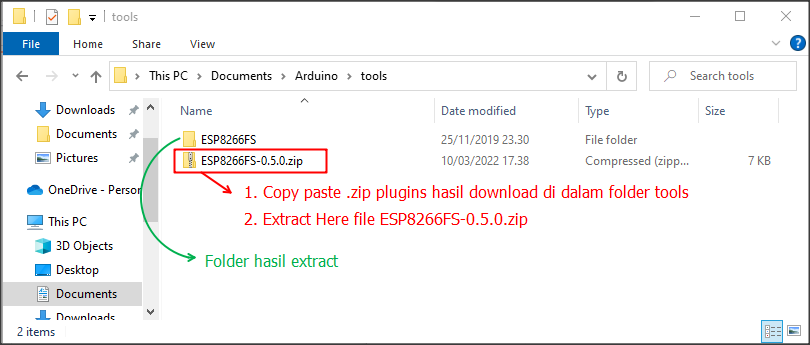
Copy paste dan extract file ESP8266FS-0.5.0.zip hasil download.
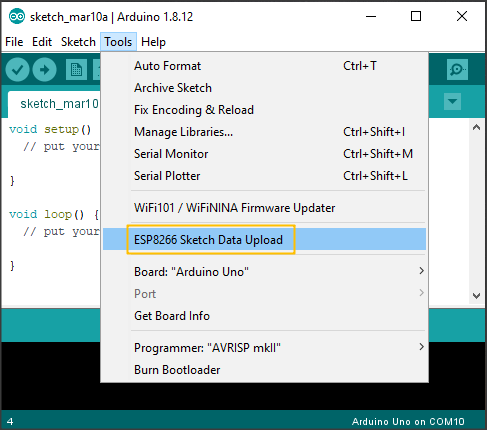
Tutup dan buka kembali Arduino IDE kemudian klik tab Tools. Jika di list terdapat ESP8266 Sketch Data Upload, berarti plugins Arduino ESP8266 filesystem uploader berhasil terinstal.
-
Download Source Code
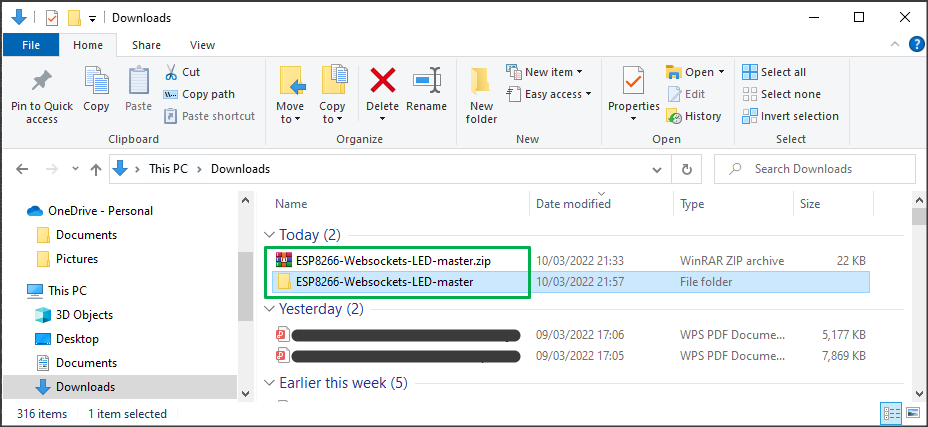
Source code dapat kita download melalui link https://github.com/wirekraken/ESP8266-Websockets-LED/archive/refs/heads/master.zip
Setelah berhasil didownload, extract file .zip, buka folder "ESP8266-Websockets-LED-master" kemudian kita copy folder di dalamnya yaitu folder "ESP8266-LED"

3. Upload Sketch & Folder Data dari Original Source Code
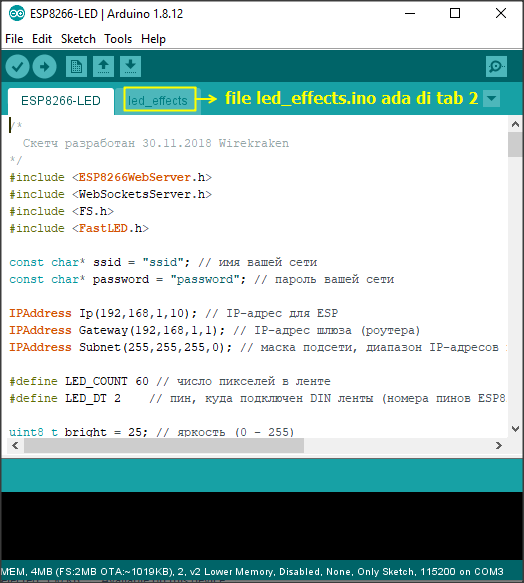
Copy paste folder "ESP8266-LED" ke folder kerja yang diinginkan. Di dalam folder ESP8266-LED ini terdapat main program ESP8266-LED.ino, sub program led_effects.ino dan folder data. Di dalam folder data terdapat 3 file javascript, 1 file css dan 1 file html. Folder data ini yang akan kita upload ke ESP8266.

Dobel klik file ESP8266-LED.ino untuk membuka sketch di Arduino IDE.
-
Upload Folder data
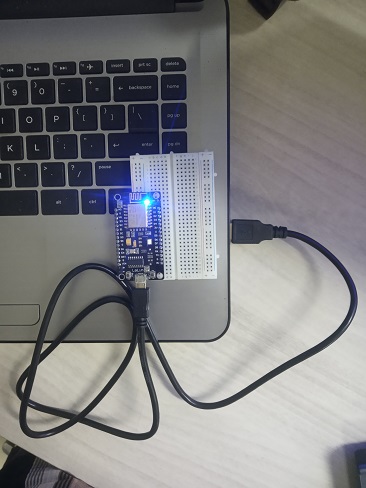
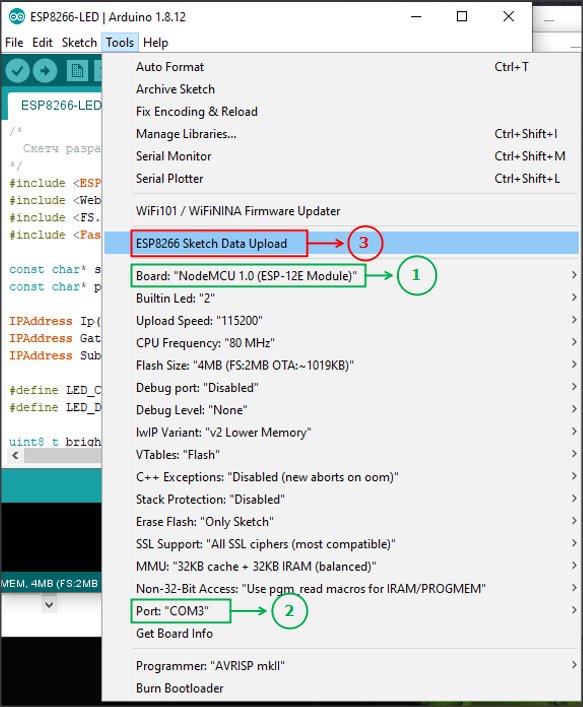
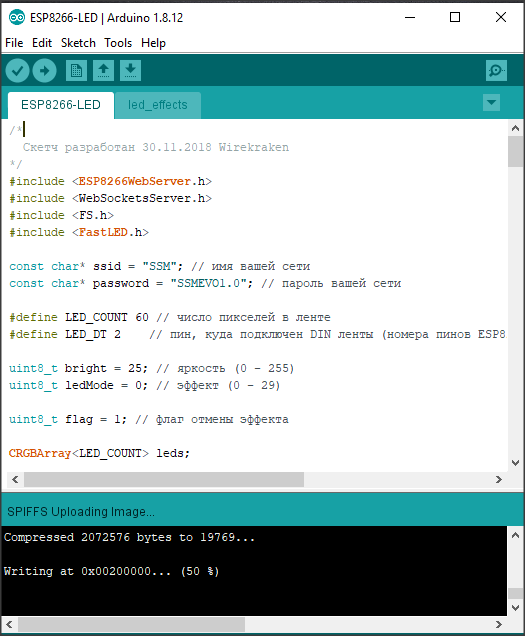
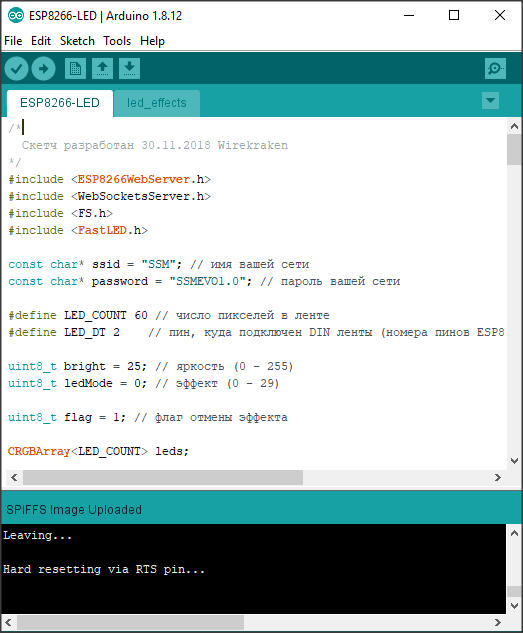
Hubungkan NodeMCU dengan PC atau laptop melalui port USB kemudian pilih board NodeMCU 1.0 (ESP-12E Module), pilih Port kemudian pilih ESP8266 Sketch Data Upload untuk mengupload folder data
Tunggu sampai proses SPIFFS (SPI Flash File System) Uploading selesai.
-
Upload Sketch
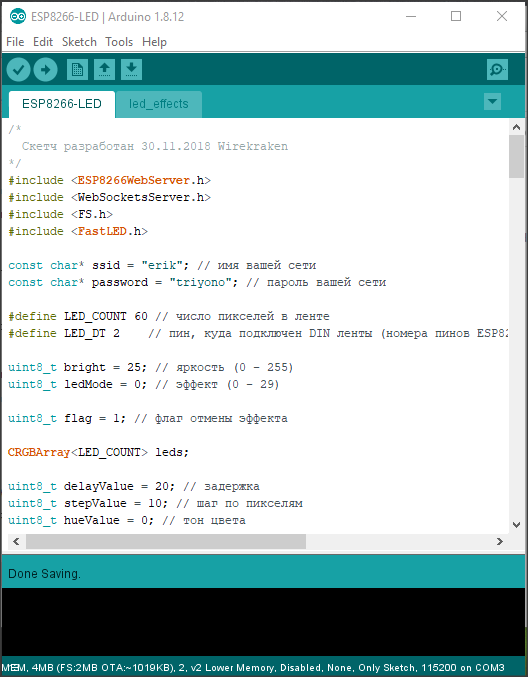
Assign variabel ssid dan password pada sketch sesuai dengan ssid dan password di jaringan WiFi yang anda gunakan. Karena jaringan yang saya gunakan menggunakan protokol DHCP, maka saya tidak perlu melakukan setting IP Address pada sketch sehingga sketch saya update di bagian inisialisasi variabel dan di bagian void setup() seperti berikut ini:
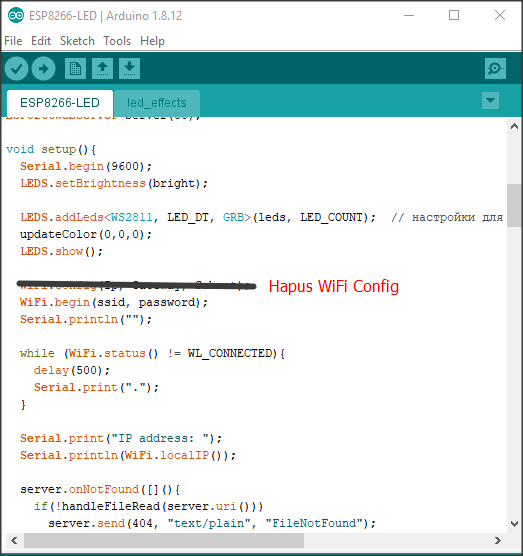
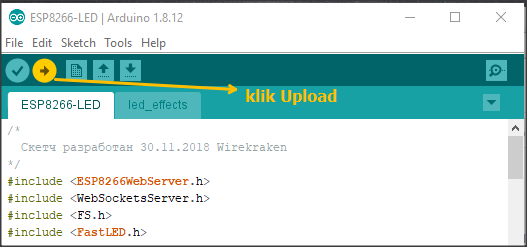
Jadi di sketch ESP8266-LED.ino ini, update yang dilakukan hanya bersifat konfigurasi WiFi saja. Setelah itu sketch sudah bisa kita upload dengan mengklik tombol Upload.
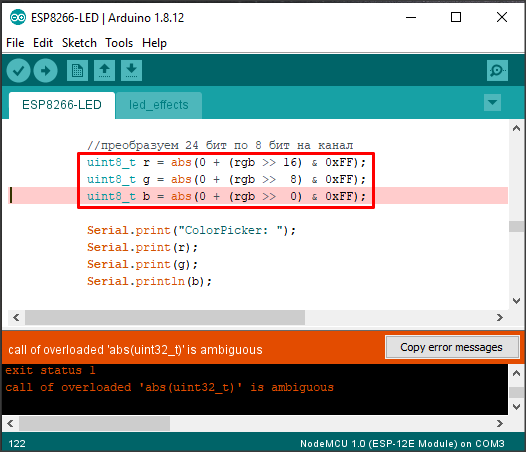
Ternyata ketika proses upload terdapat error sebagai berikut:
Yang saya lakukan ketika pertama kali mendapati error tersebut saya tetap tenang dan tidak langsung panik 😜
Karena errornya disebabkan oleh function abs(), maka saya hilangkan aja fungsi abs() nya. Engga usah pusing-pusing, karena masih banyak urusan yang lebih penting hehe...
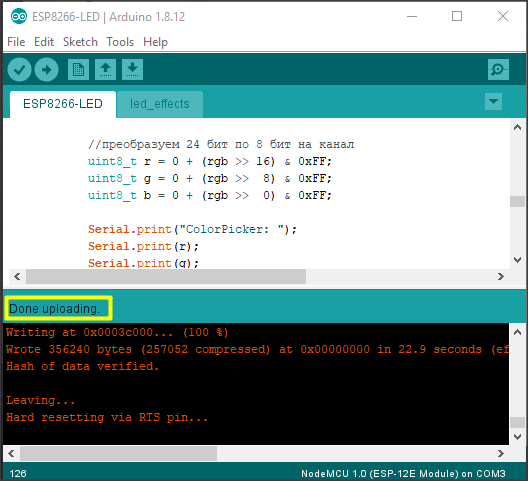
Setelah itu saya upload ulang dan Alhamdulillah sketch berhasil diupload ke NodeMCU ESP8266.
-
Test Running Program
Setelah sketch berhasil diupload klik Serial Monitor pada Arduino IDE untuk mendapatkan IP Address dari NodeMCU yang berfungsi sebagai web server. Jika Serial Monitor tidak menampilkan apa-apa alias blank, tekan tombol RST (reset) pada board Lolin NodeMCU v3 dan tunggu sampai Serial Monitor menampilkan IP Address untuk web servernya.
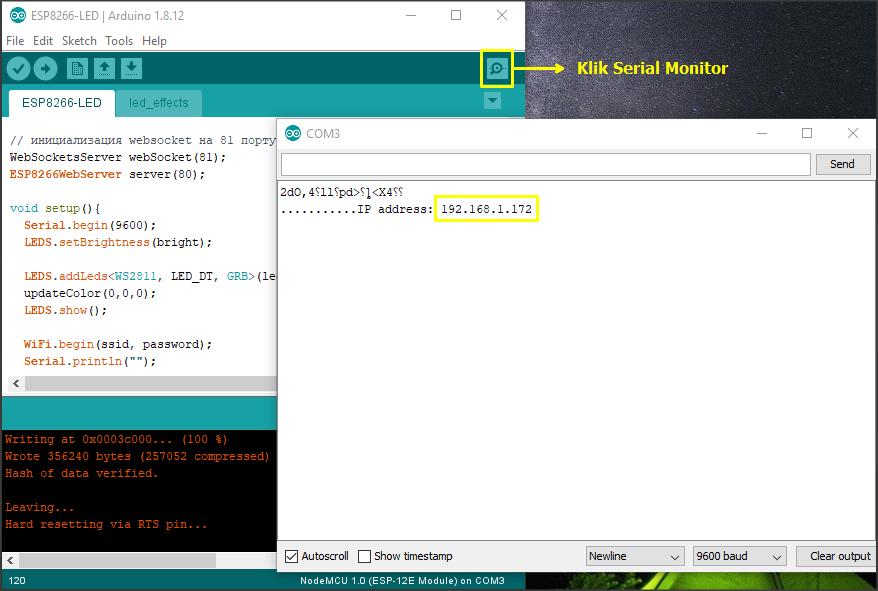
Di Serial Monitor tertera IP Address dari ESP8266 yaitu 192.168.1.172
Masukkan IP Address tersebut pada address bar web browser Mozilla Firefox, maka akan tampil halaman web seperti berikut:
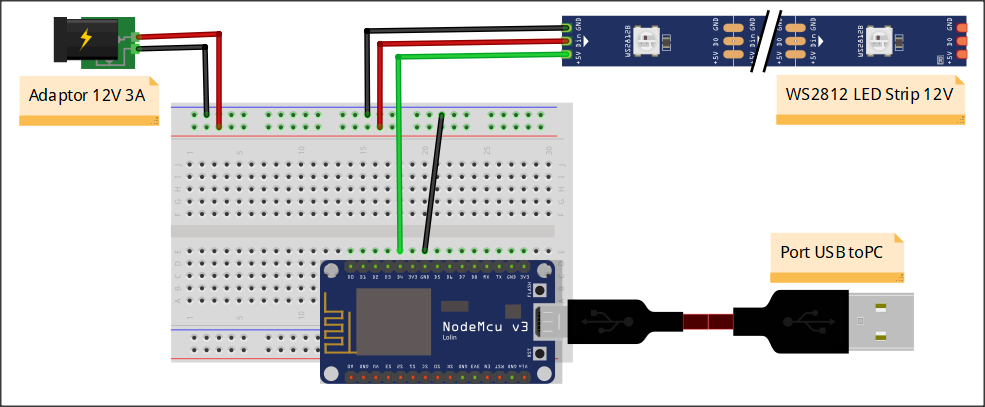
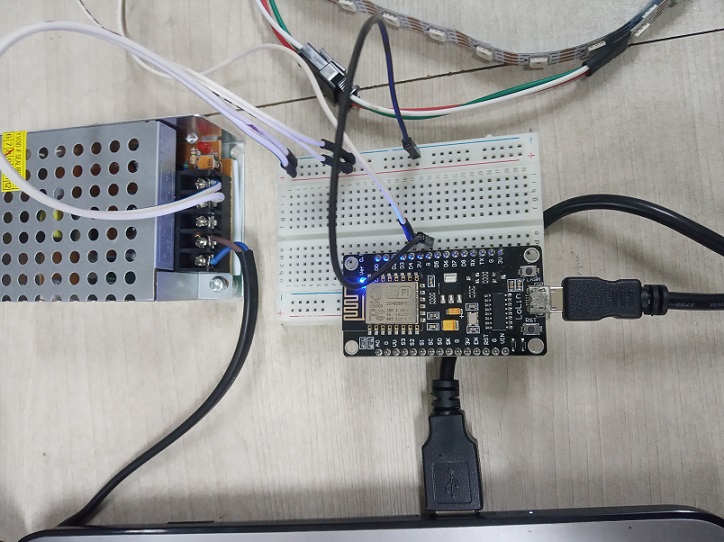
4. Rangkaian Elektrikal
Rangkai komponen-komponen elektrikal yang sudah disebutkan di tahap persiapan seperti wiring diagram berikut:
Sampai tahap ini kita sudah bisa menjalankan program LED strip controller melalui halaman web seperti pada link videonya Wirekraken berikut:
Tapi kalau teman-teman masih ingin melanjutkan tutorial ini untuk mendapatkan varian efek animasi lainnya silahkan scroll terus sampai bawah.
5. Modifikasi Sketch
Ada 3 file yang saya modifikasi untuk mengganti efek animasi seperti pada tutorial "Bermain Lampu Animasi Addressable LED Strip WS2812 Efek Meteor dengan FastLED Arduino", yaitu: ESP8266-LED.ino, led_effects.ino dan 1 file di dalam folder data yaitu index.html
-
ESP8266-LED.ino
Dobel klik file ESP8266-LED.ino untuk kita edit di Arduino IDE. Hapus semua sketch, kemudian copy paste sketch di bawah, kemudian save.
#include <ESP8266WebServer.h>
#include <WebSocketsServer.h>
#include <FS.h>
#include <FastLED.h>

const char* ssid = "erik";
const char* password = "triyono";

#define DATA_PIN 2
#define LED_TYPE WS2812
#define NUM_LEDS 60
#define FRAMES_PER_SECOND  100

uint8_t bright = 25;
uint8_t ledMode = 0;
uint8_t flag = 1;

uint8_t hue = 60;
uint8_t gHue = 0;

// variables for Twinkle
CRGBPalette16 gCurrentPalette;
CRGBPalette16 gTargetPalette;
CRGBPalette16 gPal;

// How often to change color palettes.
#define SECONDS_PER_PALETTE  15 // 30

//CRGBArray<NUM_LEDS> leds;
CRGB leds[NUM_LEDS+1];

WebSocketsServer webSocket(81);
ESP8266WebServer server;


void setup() {
  WiFi.begin(ssid, password);
  Serial.begin(115200);

  while (WiFi.status() != WL_CONNECTED){
    delay(500);
    Serial.print(".");
  }

  FastLED.setBrightness(bright);
  FastLED.addLeds<LED_TYPE, DATA_PIN, GRB>(leds, NUM_LEDS);
  updateColor(0,0,0);
  FastLED.show();


  Serial.println("");
  Serial.print("IP address: ");
  Serial.println(WiFi.localIP());

  server.onNotFound([](){
    if(!handleFileRead(server.uri()))
      server.send(404, "text/plain", "FileNotFound");
  });

  server.begin();
  SPIFFS.begin();

  webSocket.begin();
  webSocket.onEvent(webSocketEvent);
}

void loop() {
  webSocket.loop();
  server.handleClient();

  if(!flag) {
    ledEffect(ledMode);
  }
}


void webSocketEvent(uint8_t num, WStype_t type, uint8_t * payload, size_t length){
  if(type == WStype_CONNECTED){
    IPAddress ip = webSocket.remoteIP(num);

    String message = String("Connected");
    webSocket.broadcastTXT(message);
  }

  if(type == WStype_TEXT){
    String data;
    for(int x = 0; x < length; x++){
      if(!isdigit(payload[x])) continue;
      data += (char) payload[x];
    }

    if(payload[0] == 'B'){
        flag = 0;
        Serial.print("Bright: ");
        bright = data.toInt();
        Serial.println(data);
        FastLED.setBrightness(bright);

    } else if(payload[0] == 'F'){
        flag = 0;
        Serial.print("Function: ");
        ledMode = data.toInt();
        Serial.println(data);
        ledEffect(ledMode);

    } else if(payload[0] == '#'){

      if(!flag) {
        Serial.print("flag : ");
        Serial.println(flag);
        ledMode = flag;
        ledEffect(ledMode);
        flag = 1;
      } else {
        uint32_t rgb = (uint32_t) strtol((const char *) &payload[1], NULL, 16);

        uint8_t r = (0 + (rgb >> 16) & 0xFF);
        uint8_t g = (0 + (rgb >>  8) & 0xFF);
        uint8_t b = (0 + (rgb >>  0) & 0xFF);

        Serial.print("ColorPicker: ");
        Serial.print(r);
        Serial.print(g);
        Serial.println(b);

        for(int x = 0; x < NUM_LEDS; x++){
         leds[x].setRGB(r,g,b);
        }
        FastLED.show();
      }

    }
  }
}


void ledEffect(int ledMode){
    FastLED.delay(1000/FRAMES_PER_SECOND);

    EVERY_N_MILLISECONDS( 20 ) { gHue++; }

    switch(ledMode){
      case 0: updateColor(0,0,0); break;
      case 1: sinelon(); break;
      case 2: bpm(); break;
      case 3: alternateColor(); break;
      case 4: gradient_fill(); break;
      case 5: SnowSparkle(); break;
      case 6: fire(); break;
      case 7: drawTwinkles(); break;
      case 8: juggle(); break;
      case 9: marque_v3(); break;
      case 10: meteorShower();
    }

    EVERY_N_SECONDS(7) {
      hue = hue + random8(30,61);
    }

    EVERY_N_SECONDS( SECONDS_PER_PALETTE ) {
      chooseNextColorPalette( gTargetPalette );
    }

    EVERY_N_MILLISECONDS( 10 ) {
      nblendPaletteTowardPalette( gCurrentPalette, gTargetPalette, 12);
    }

    EVERY_N_MILLISECONDS( 40 ) {
      FastLED.show();
    }

}

String getContentType(String filename){
    if(server.hasArg("download")) return "application/octet-stream";
    else if(filename.endsWith(".htm")) return "text/html";
    else if(filename.endsWith(".html")) return "text/html";
    else if(filename.endsWith(".css")) return "text/css";
    else if(filename.endsWith(".js")) return "application/javascript";
    else if(filename.endsWith(".png")) return "image/png";
    else if(filename.endsWith(".gif")) return "image/gif";
    else if(filename.endsWith(".jpg")) return "image/jpeg";
    else if(filename.endsWith(".ico")) return "image/x-icon";
    else if(filename.endsWith(".xml")) return "text/xml";
    else if(filename.endsWith(".pdf")) return "application/x-pdf";
    else if(filename.endsWith(".zip")) return "application/x-zip";
    else if(filename.endsWith(".gz")) return "application/x-gzip";
    return "text/plain";

}

bool handleFileRead(String path){
  #ifdef DEBUG
    Serial.println("handleFileRead: " + path);
  #endif
  if(path.endsWith("/")) path += "index.html";
  if(SPIFFS.exists(path)){
    File file = SPIFFS.open(path, "r");
    size_t sent = server.streamFile(file, getContentType(path));
    file.close();
    return true;
  }
  return false;

}
-
led_effects.ino
Buka file led_effects.ino di Arduino IDE hapus semua sketch, kemudian copy paste sketch di bawah, kemudian save.
uint8_t spacing = 20;

// marque_v3 variable
int16_t pos;
int8_t advance;
uint8_t color;
uint8_t hue2_shift = 60;
boolean fadingTail = 1;
uint8_t fadeRate = 70;
int8_t delta = 1;
uint8_t width = 5;

// meteor shower variable
byte ledsX[NUM_LEDS][3];
boolean RAINBOWs = false;
boolean RANDOMpick = false;
uint16_t timeframe;
byte idex = 0;
byte colorTIP = 0;
byte meteorLENGTH;
byte loopCount = 1;

// fire variable
#define COOLING  75 //55
#define SPARKING 60 //120
#define AUTO_SELECT_BACKGROUND_COLOR 0
CRGB gBackgroundColor = CRGB::Black;

// draw twinkles variable
#define TWINKLE_SPEED 6 // 4
#define TWINKLE_DENSITY 5
#define COOL_LIKE_INCANDESCENT 1

void updateColor(uint8_t r,uint8_t g,uint8_t b){
  for(uint8_t i = 0 ; i < NUM_LEDS; i++ ){
    leds[i].setRGB(r,g,b);
  }
}

void sinelon() {
  // a colored dot sweeping back and forth, with fading trails
  fadeToBlackBy( leds, NUM_LEDS, 20);
  int pos = beatsin16(13,0,NUM_LEDS);
  leds[pos] += CHSV( gHue, 255, 192);

}

void bpm() {
  // colored stripes pulsing at a defined Beats-Per-Minute (BPM)
  uint8_t BeatsPerMinute = 62;
  CRGBPalette16 palette = PartyColors_p;
  uint8_t beat = beatsin8( BeatsPerMinute, 64, 255);

  for( int i = 0; i < NUM_LEDS; i++) { //9948
    leds[i] = ColorFromPalette(palette, gHue+(i*2), beat-gHue+(i*10));
  }
}

void SnowSparkle() {
  byte red=0x00;
  byte green=0x00;
  byte blue=0x10;
  int SparkleDelay=20;
  int SpeedDelay=random(100,1000);

  setAll(red,green,blue);

  int Pixel = random(NUM_LEDS+1);

  setPixel(Pixel,0xaa,0xaa,0xff);
  showStrip();
  delay(SparkleDelay);

  setPixel(Pixel,red,green,blue);
  showStrip();
  delay(SpeedDelay);
}

void juggle() {
  // eight colored dots, weaving in and out of sync with each other
  fadeToBlackBy( leds, NUM_LEDS, 20);
  byte dothue = 0;

  for( int i = 0; i < 8; i++) {
    leds[beatsin16(i+7,0,NUM_LEDS)] |= CHSV(dothue, 200, 255);
    dothue += 32;
  }
}

void alternateColor() {
  FastLED.clear();
  byte red=random(255);
  byte green= random(255);
  byte blue=random(255);
  byte red2=random(255);
  byte green2= random(255);
  byte blue2=random(255);
  uint8_t wait=60;

  for (uint16_t i=0; i < NUM_LEDS+1; i++) {
    if(i%2 == 0) { // set even LED to color 1
      setPixel(i,red,green,blue);
    } else { // set odd LED to color 2
      setPixel(i,red2,green2,blue2);
    }
  }

  FastLED.show(); // apply the colors
  delay(wait);

  for(uint16_t i=0; i < NUM_LEDS+1; i++) {
    if(i%2 == 0) { // set even LED to color 2
      setPixel(i,red,green,blue);
    } else { // set odd LED to color 1
      setPixel(i,red2,green2,blue2);
    }
  }

  FastLED.show(); // apply the colors
  delay(wait);
}

void gradient_fill() {
  //  uint8_t hue1 = 60;
  //  uint8_t hue2 = random8(255);
  uint8_t hue1 = random8(255);
  uint8_t hue2 = hue1 + random8(30,61);

  for( int i = 0; i < NUM_LEDS; i++) {
    //fill_gradient (leds, 0, CHSV(0, 255, 255), i, CHSV(96, 255, 255), SHORTEST_HUES);
    fill_gradient (leds, 0, CHSV(hue1, 255, 255), i, CHSV(hue2, 255, 255), SHORTEST_HUES);
    delay(15);
    FastLED.show();
    //  FastLED.clear();
  }
}

void marque_v3() {
  for (uint8_t i=0; i < (NUM_LEDS/spacing); i++) {
    for (uint8_t w = 0; w < width; w++) {
      pos = (spacing * (i-1) + spacing + advance + w) % NUM_LEDS;
      if ( w % 2== 0 ){  // Is w even or odd?
        color = hue;
      } else {
        color = hue + hue2_shift;
      }

      leds[pos] = CHSV(color,255,255);
    }

    delay(10);
  }

  FastLED.show();

  // Fade out tail or set back to black for next loop around.
  if (fadingTail == 1) {
    fadeToBlackBy(leds, NUM_LEDS,fadeRate);
  } else {
    for (uint8_t i=0; i < (NUM_LEDS/spacing); i++) {
      for (uint8_t w = 0; w < width; w++) {
        pos = (spacing * (i-1) + spacing + advance + w) % NUM_LEDS;
        leds[pos] = CRGB::Black;
      }
    }
  }

  // Advance pixel postion down strip, and rollover if needed.
  advance = (advance + delta + NUM_LEDS) % NUM_LEDS;
}

void meteorShower(){
  //hue master
  hue++;

  //populate the leds[] with stored ledsX[] array data
  for(byte i = 0; i < NUM_LEDS; i++ ) {
    ledsX[i][0] = leds[i].r;
    ledsX[i][1] = leds[i].g;
    ledsX[i][2] = leds[i].b;
  }
  //clear the previous counter clockwise position
  byte iCCW;

  //we are keeping track of elapsed time
  timeframe++;    //fx timer

  //meteorLENGTH fx is only shown for this time frame
  if((timeframe >= 1) && (timeframe <= 280)) {
    meteorLENGTH = 29;
  }

  if((timeframe > 280) && (timeframe <= 500)) {
    meteorLENGTH = 45;
  }

  //RAINBOWs fx add rainbow tails during this time frame only
  if((timeframe > 0) && (timeframe <= 280)) {
    RAINBOWs = true;
  } else {
    RAINBOWs = false;
  }

  //keep our RAINBOWs within a specific range of hue
  if(RAINBOWs == true){
    hue = hue - 20;
    if(hue <= 0){
      hue = 1;
    }
  }

  //RANDOMpick fx is only enabled during this timeframe
  if ((timeframe > 600) && (timeframe <= 790)) {
    RANDOMpick = true;
  } else {
    RANDOMpick = false;
  }

  //pick a random spot in the meteor switch case statement below
  if (RANDOMpick == true){
    idex = random8(46);
  } else {
    //increment the meteor display frame
    idex++;

    //make sure we don't drift into space
    if (idex > meteorLENGTH) {
      idex = 0;
    }
  }

  //meteorLENGTH is randomized during this timeframe only
  if((timeframe > 790) && (timeframe <= 1090)) {
    meteorLENGTH = random8(7, 38);
  }

  //during this point in the animation timeframe
  if(timeframe == 1180) {
    //reset the timeframe
    timeframe = 0;
    //increment the loop counter
    loopCount++;
  }

  //during this part of the loopCount, all meteors have a white colored tip
  if(loopCount == 1) { colorTIP = 0; }
  if(loopCount == 2) { colorTIP = 1; }
  if(loopCount == 3) { colorTIP = random8(11); }
  //end of the desired fx, reset the variable for the next time around
  if(loopCount == 4) {
    colorTIP = 0;
    loopCount = 0;
  }

  //there are two switch case statements nestled into one another
  //we always want to control the color of the meteor tip
  //the other controls the actual meteor animation in 45 frames/case statements
  switch (idex) {
    case 0:
      switch (colorTIP) {
        case 0:
          leds[0] = CHSV(hue, 255, 255);
          break;
        case 1:
          leds[0] = CRGB(100,100,100);
          break;
        case 2:
          leds[0] = CRGB::Yellow;
          break;
        case 3:
          leds[0] = CRGB::Violet;
          break;
        case 4:
          leds[0] = CRGB::Green;
          break;
        case 5:
          leds[0] = CRGB::Purple;
          break;
        case 6:
          leds[0] = CRGB::Orange;
          break;
        case 7:
          leds[0] = CRGB::Cyan;
          break;
        case 8:
          leds[0] = CRGB::GreenYellow;
          break;
        case 9:
          leds[0] = CRGB::Magenta;
          break;
        case 10:
          leds[0] = CRGB::SkyBlue;
      }
      break;

    case 1:
      leds[0] = CHSV((hue - 20), 255, 210);
      break;
    case 2:
      leds[0] = CHSV((hue - 22), 255, 180);
      break;
    case 3:
      leds[0] = CHSV((hue - 23), 255, 150);
      break;
    case 4:
      leds[0] = CHSV((hue - 24), 255, 110);
      break;
    case 5:
      leds[0] = CHSV((hue - 25), 255, 90);
      break;
    case 6:
      leds[0] = CHSV((hue - 26), 160, 60);
      break;
    case 7:
      leds[0] = CHSV((hue - 27), 140, 40);
      break;
    case 8:
      leds[0] = CHSV((hue - 28), 120, 20);
      break;
    case 9:
      leds[0] = CHSV((hue - 29), 100, 20);
      break;
    case 10:
      leds[0] = CRGB::Black;
      break;
    case 11:
      leds[0] = CRGB::Black;
      break;
    case 12:
      leds[0] = CRGB::Black;
      break;
    case 13:
      leds[0] = CRGB::Black;
      break;
    case 14:
      leds[0] = CRGB::Black;
      break;
    case 15:
      leds[0] = CRGB::Black;
      break;
    case 16:
      leds[0] = CRGB::Black;
      break;
    case 17:
      leds[0] = CRGB::Black;
      break;
    case 18:
      leds[0] = CRGB::Black;
      break;
    case 19:
      leds[0] = CRGB::Black;
      break;
    case 20:
      leds[0] = CRGB::Black;
      break;
    case 21:
      leds[0] = CRGB::Black;
      break;
    case 22:
      leds[0] = CRGB::Black;
      break;
    case 23:
      leds[0] = CRGB::Black;
      break;
    case 24:
      leds[0] = CRGB::Black;
      break;
    case 25:
      leds[0] = CRGB::Black;
      break;
    case 26:
      leds[0] = CRGB::Black;
      break;
    case 27:
      leds[0] = CRGB::Black;
      break;
    case 28:
      leds[0] = CRGB::Black;
      break;
    case 29:
      leds[0] = CRGB::Black;
      break;
    case 30:
      leds[0] = CRGB::Black;
      break;
    case 31:
      leds[0] = CRGB::Black;
      break;
    case 32:
      leds[0] = CRGB::Black;
      break;
    case 33:
      leds[0] = CRGB::Black;
      break;
    case 34:
      leds[0] = CRGB::Black;
      break;
    case 35:
      leds[0] = CRGB::Black;
      break;
    case 36:
      leds[0] = CRGB::Black;
      break;
    case 37:
      leds[0] = CRGB::Black;
      break;
    case 38:
      leds[0] = CRGB::Black;
      break;
    case 39:
      leds[0] = CRGB::Black;
      break;
    case 40:
      leds[0] = CRGB::Black;
      break;
    case 41:
      leds[0] = CRGB::Black;
      break;
    case 42:
      leds[0] = CRGB::Black;
      break;
    case 43:
      leds[0] = CRGB::Black;
      break;
    case 44:
      leds[0] = CRGB::Black;
      break;
    case 45:
      leds[0] = CRGB::Black;
      break;

  }

  //copy the LED Array
  for(byte i = 1; i < NUM_LEDS; i++ ) {
    iCCW = adjacent_ccw(i);
    leds[i].r = ledsX[iCCW][0];
    leds[i].g = ledsX[iCCW][1];
    leds[i].b = ledsX[iCCW][2];
  }

  delay(30);
}

DEFINE_GRADIENT_PALETTE( heatmap_gp ) {
  0,     0,  0,  0,   //black
  128,   0,  255,  0,   //red
  102,   255,255,  0,   //bright yellow
  255,   255,255,255    //full white
};

void fire() {
  //gPal = HeatColors_p;
  CRGBPalette16 myPal = heatmap_gp;
  gPal = myPal;
  hue=0;
  //gPal = CRGBPalette16( CRGB::Black, CRGB::Red, CRGB::Yellow, CRGB::White);
  Fire2012WithPalette(); // run simulation frame, using palette colors
}

void Fire2012WithPalette() {
  // Array of temperature readings at each simulation cell
  static byte heat[NUM_LEDS];

  // Step 1.  Cool down every cell a little
  for( int i = 0; i < NUM_LEDS; i++) {
    heat[i] = qsub8( heat[i],  random8(0, ((COOLING * 10) / NUM_LEDS) + 2));
  }

  // Step 2.  Heat from each cell drifts 'up' and diffuses a little
  for( int k= NUM_LEDS - 1; k >= 2; k--) {
    heat[k] = (heat[k - 1] + heat[k - 2] + heat[k - 2] ) / 3;
  }

  // Step 3.  Randomly ignite new 'sparks' of heat near the bottom
  if( random8() < SPARKING ) {
    int y = random8(7);
    heat[y] = qadd8( heat[y], random8(160,255) );
  }

  // Step 4.  Map from heat cells to LED colors
  for( int j = 0; j < NUM_LEDS; j++) {
    // Scale the heat value from 0-255 down to 0-240
    // for best results with color palettes.
    byte colorindex = scale8( heat[j], 240);
    CRGB color = ColorFromPalette( gPal, colorindex);
    int pixelnumber;

    if( true) { //reverse
      pixelnumber = (NUM_LEDS-1) - j;
    } else {
      pixelnumber = j;
    }

    leds[pixelnumber] = color;
  }
}

void drawTwinkles() {
  // "PRNG16" is the pseudorandom number generator
  // It MUST be reset to the same starting value each time
  // this function is called, so that the sequence of 'random'
  // numbers that it generates is (paradoxically) stable.

  uint16_t PRNG16 = 11337;

  uint32_t clock32 = millis();

  // Set up the background color, "bg".
  // if AUTO_SELECT_BACKGROUND_COLOR == 1, and the first two colors of
  // the current palette are identical, then a deeply faded version of
  // that color is used for the background color
  CRGB bg;

  if( (AUTO_SELECT_BACKGROUND_COLOR == 1) && (gCurrentPalette[0] == gCurrentPalette[1] )) {
    bg = gCurrentPalette[0];
    uint8_t bglight = bg.getAverageLight();

    if( bglight > 64) {
      bg.nscale8_video( 16); // very bright, so scale to 1/16th
    } else if( bglight > 16) {
      bg.nscale8_video( 64); // not that bright, so scale to 1/4th
    } else {
      bg.nscale8_video( 86); // dim, scale to 1/3rd.
    }
  } else {
    bg = gBackgroundColor; // just use the explicitly defined background color
  }

  uint8_t backgroundBrightness = bg.getAverageLight();

  for( CRGB& pixel: leds) {
    PRNG16 = (uint16_t)(PRNG16 * 2053) + 1384; // next 'random' number
    uint16_t myclockoffset16= PRNG16; // use that number as clock offset
    PRNG16 = (uint16_t)(PRNG16 * 2053) + 1384; // next 'random' number
    // use that number as clock speed adjustment factor (in 8ths, from 8/8ths to 23/8ths)
    uint8_t myspeedmultiplierQ5_3 =  ((((PRNG16 & 0xFF)>>4) + (PRNG16 & 0x0F)) & 0x0F) + 0x08;
    uint32_t myclock30 = (uint32_t)((clock32 * myspeedmultiplierQ5_3) >> 3) + myclockoffset16;
    uint8_t  myunique8 = PRNG16 >> 8; // get 'salt' value for this pixel

    // We now have the adjusted 'clock' for this pixel, now we call
    // the function that computes what color the pixel should be based
    // on the "brightness = f( time )" idea.
    CRGB c = computeOneTwinkle( myclock30, myunique8);

    uint8_t cbright = c.getAverageLight();
    int16_t deltabright = cbright - backgroundBrightness;
    if( deltabright >= 32 || (!bg)) {
      // If the new pixel is significantly brighter than the background color,
      // use the new color.
      pixel = c;
    } else if( deltabright > 0 ) {
      // If the new pixel is just slightly brighter than the background color,
      // mix a blend of the new color and the background color
      pixel = blend( bg, c, deltabright * 8);
    } else {
      // if the new pixel is not at all brighter than the background color,
      // just use the background color.
      pixel = bg;
    }
  }
}


byte adjacent_ccw(byte i) {
  byte r;
  if (i > 0) { r = i - 1; }
  else { r = NUM_LEDS - 1; }
  return r;
}

void showStrip() {
  #ifdef ADAFRUIT_NEOPIXEL_H
    strip.show();
  #endif

  #ifndef ADAFRUIT_NEOPIXEL_H
    FastLED.show();
  #endif
}

void setAll(byte red, byte green, byte blue) {
  for(int i = 0; i < NUM_LEDS+1; i++ ) {
    setPixel(i, red, green, blue);
  }

  showStrip();
}

void setPixel(int Pixel, byte red, byte green, byte blue) {
  #ifdef ADAFRUIT_NEOPIXEL_H
    strip.setPixelColor(NUM_LEDS-Pixel, strip.Color(red, green, blue));
  #endif

  #ifndef ADAFRUIT_NEOPIXEL_H
    leds[NUM_LEDS-Pixel].r = red;
    leds[NUM_LEDS-Pixel].g = green;
    leds[NUM_LEDS-Pixel].b = blue;
  #endif
}


// This function takes a pixel, and if its in the 'fading down'
// part of the cycle, it adjusts the color a little bit like the
// way that incandescent bulbs fade toward 'red' as they dim.
void coolLikeIncandescent( CRGB& c, uint8_t phase) {
  if( phase < 128) return;

  uint8_t cooling = (phase - 128) >> 4;
  c.g = qsub8( c.g, cooling);
  c.b = qsub8( c.b, cooling * 2);
}

// A mostly red palette with green accents and white trim.
// "CRGB::Gray" is used as white to keep the brightness more uniform.
const TProgmemRGBPalette16 RedGreenWhite_p FL_PROGMEM ={
  CRGB::Red, CRGB::Red, CRGB::Red, CRGB::Red,
  CRGB::Red, CRGB::Red, CRGB::Red, CRGB::Red,
  CRGB::Red, CRGB::Red, CRGB::Gray, CRGB::Gray,
  CRGB::Green, CRGB::Green, CRGB::Green, CRGB::Green
};

// A mostly (dark) green palette with red berries.
#define Holly_Green 0x00580c
#define Holly_Red   0xB00402
const TProgmemRGBPalette16 Holly_p FL_PROGMEM = {
  Holly_Green, Holly_Green, Holly_Green, Holly_Green,
  Holly_Green, Holly_Green, Holly_Green, Holly_Green,
  Holly_Green, Holly_Green, Holly_Green, Holly_Green,
  Holly_Green, Holly_Green, Holly_Green, Holly_Red
};

// A red and white striped palette
// "CRGB::Gray" is used as white to keep the brightness more uniform.
const TProgmemRGBPalette16 RedWhite_p FL_PROGMEM = {
  CRGB::Red,  CRGB::Red,  CRGB::Red,  CRGB::Red,
  CRGB::Gray, CRGB::Gray, CRGB::Gray, CRGB::Gray,
  CRGB::Red,  CRGB::Red,  CRGB::Red,  CRGB::Red,
  CRGB::Gray, CRGB::Gray, CRGB::Gray, CRGB::Gray
};

// A mostly blue palette with white accents.
// "CRGB::Gray" is used as white to keep the brightness more uniform.
const TProgmemRGBPalette16 BlueWhite_p FL_PROGMEM = {
  CRGB::Blue, CRGB::Blue, CRGB::Blue, CRGB::Blue,
  CRGB::Blue, CRGB::Blue, CRGB::Blue, CRGB::Blue,
  CRGB::Blue, CRGB::Blue, CRGB::Blue, CRGB::Blue,
  CRGB::Blue, CRGB::Gray, CRGB::Gray, CRGB::Gray
};

// A pure "fairy light" palette with some brightness variations
#define HALFFAIRY ((CRGB::FairyLight & 0xFEFEFE) / 2)
#define QUARTERFAIRY ((CRGB::FairyLight & 0xFCFCFC) / 4)
const TProgmemRGBPalette16 FairyLight_p FL_PROGMEM = {
  CRGB::FairyLight, CRGB::FairyLight, CRGB::FairyLight, CRGB::FairyLight,
  HALFFAIRY,        HALFFAIRY,        CRGB::FairyLight, CRGB::FairyLight,
  QUARTERFAIRY,     QUARTERFAIRY,     CRGB::FairyLight, CRGB::FairyLight,
  CRGB::FairyLight, CRGB::FairyLight, CRGB::FairyLight, CRGB::FairyLight
};

// A palette of soft snowflakes with the occasional bright one
const TProgmemRGBPalette16 Snow_p FL_PROGMEM = {
  0x304048, 0x304048, 0x304048, 0x304048,
  0x304048, 0x304048, 0x304048, 0x304048,
  0x304048, 0x304048, 0x304048, 0x304048,
  0x304048, 0x304048, 0x304048, 0xE0F0FF
};


// A palette reminiscent of large 'old-school' C9-size tree lights
// in the five classic colors: red, orange, green, blue, and white.
#define C9_Red    0xB80400
#define C9_Orange 0x902C02
#define C9_Green  0x046002
#define C9_Blue   0x070758
#define C9_White  0x606820
const TProgmemRGBPalette16 RetroC9_p FL_PROGMEM = {
  C9_Red,    C9_Orange, C9_Red,    C9_Orange,
  C9_Orange, C9_Red,    C9_Orange, C9_Red,
  C9_Green,  C9_Green,  C9_Green,  C9_Green,
  C9_Blue,   C9_Blue,   C9_Blue,
  C9_White
};

// A cold, icy pale blue palette
#define Ice_Blue1 0x0C1040
#define Ice_Blue2 0x182080
#define Ice_Blue3 0x5080C0
const TProgmemRGBPalette16 Ice_p FL_PROGMEM = {
  Ice_Blue1, Ice_Blue1, Ice_Blue1, Ice_Blue1,
  Ice_Blue1, Ice_Blue1, Ice_Blue1, Ice_Blue1,
  Ice_Blue1, Ice_Blue1, Ice_Blue1, Ice_Blue1,
  Ice_Blue2, Ice_Blue2, Ice_Blue2, Ice_Blue3
};

// Add or remove palette names from this list to control which color
// palettes are used, and in what order.
const TProgmemRGBPalette16* ActivePaletteList[] = {
  &RetroC9_p,
  &BlueWhite_p,
  &RainbowColors_p,
  &FairyLight_p,
  &RedGreenWhite_p,
  &PartyColors_p,
  &RedWhite_p,
  &Snow_p,
  &Holly_p,
  &Ice_p
};

//  This function takes a time in pseudo-milliseconds,
//  figures out brightness = f( time ), and also hue = f( time )
//  The 'low digits' of the millisecond time are used as
//  input to the brightness wave function.
//  The 'high digits' are used to select a color, so that the color
//  does not change over the course of the fade-in, fade-out
//  of one cycle of the brightness wave function.
//  The 'high digits' are also used to determine whether this pixel
//  should light at all during this cycle, based on the TWINKLE_DENSITY.
CRGB computeOneTwinkle( uint32_t ms, uint8_t salt) {
  uint16_t ticks = ms >> (8-TWINKLE_SPEED);
  uint8_t fastcycle8 = ticks;
  uint16_t slowcycle16 = (ticks >> 8) + salt;
  slowcycle16 += sin8( slowcycle16);
  slowcycle16 =  (slowcycle16 * 2053) + 1384;
  uint8_t slowcycle8 = (slowcycle16 & 0xFF) + (slowcycle16 >> 8);

  uint8_t bright = 0;

  if( ((slowcycle8 & 0x0E)/2) < TWINKLE_DENSITY) {
    bright = attackDecayWave8( fastcycle8);
  }

  uint8_t hue = slowcycle8 - salt;
  CRGB c;
  if( bright > 0) {
    c = ColorFromPalette( gCurrentPalette, hue, bright, NOBLEND);
    if( COOL_LIKE_INCANDESCENT == 1 ) {
      coolLikeIncandescent( c, fastcycle8);
    }
  } else {
    c = CRGB::Black;
  }

   return c;
}

uint8_t attackDecayWave8( uint8_t i) {
  if( i < 86) {
    return i * 3;
  } else {
    i -= 86;
    return 255 - (i + (i/2));
  }
}

// Advance to the next color palette in the list (above).
void chooseNextColorPalette( CRGBPalette16& pal) {
  const uint8_t numberOfPalettes = sizeof(ActivePaletteList) / sizeof(ActivePaletteList[0]);
  static uint8_t whichPalette = -1;
  whichPalette = addmod8( whichPalette, 1, numberOfPalettes);

  pal = *(ActivePaletteList[whichPalette]);
}
-
index.html
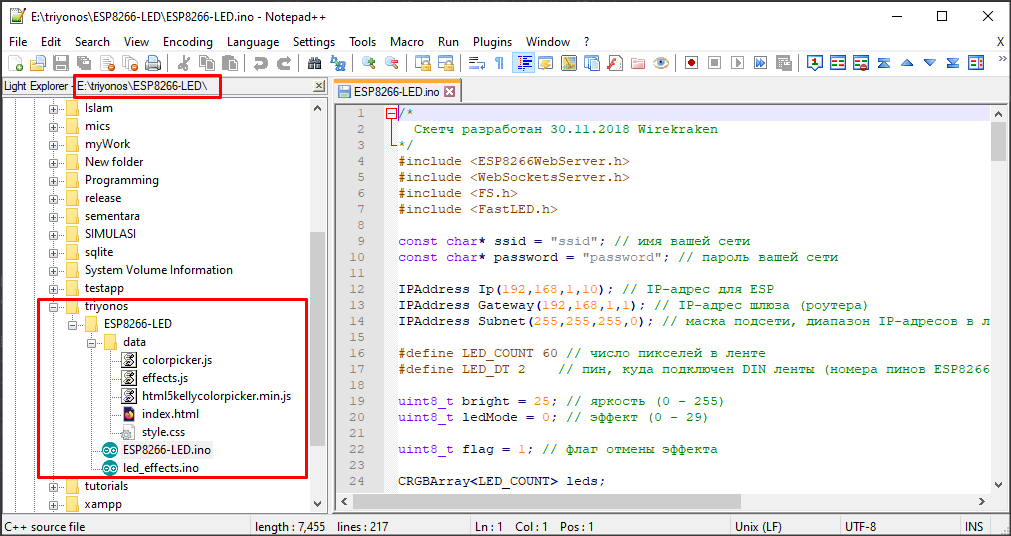
Buka file index.html yang ada di dalam folder data menggunakan notepad++. Hapus semua sketch, kemudian copy paste sketch di bawah, kemudian save.
<!DOCTYPE html>
<html lang="en">
<head>
  <meta charset="UTF-8">
  <title>color picker</title>
  <meta name="viewport" content="width=device-width, initial-scale=1.0, user-scalable=no">
  <link rel="stylesheet" href="style.css">
  <script src="html5kellycolorpicker.min.js"></script>
</head>
<body>
  <div id="container">
    <canvas id="picker"></canvas>
    <div id="shower" class="">
      <svg viewBox="0 0 10 10" id="arrow" width="80">
        <path d="M 0.7,5 L 6,10 L 7,9.4 L 3,5 L 6,1 L 5,0 Z"/>
      </svg>
      <div id="showedBlock">
        <div id="rangeBlock">
          <input type="range" id="range" step="1" value="25" min="0" max="255">
          <p id="rangeValue"></p>
        </div>
        <p id="currentEffect"></p>
        <div id="submenu">
          <span name="1">sinelon</span>
          <span name="2">bpm</span>
          <span name="3">alternate color</span>
          <span name="4">gradient fill</span>
          <span name="5">snow sparkle</span>
          <span name="6">fire</span>
          <span name="7">draw twinkles</span>
          <span name="8">juggle</span>
          <span name="9">marque</span>
          <span name="10">meteor shower</span>
        </div>
      </div>
    </div>
  </div>
  <script src="colorpicker.js"></script>
  <script src="effects.js"></script>
</body>
</html>
6. Reupload Folder Data & Sketch Modifikasi
Klik tab Tools pada Arduino IDE kemudian pilih ESP8266 Sketch Data Upload

Klik tombol Upload
Lakukan kembali test running program seperti pada langkah 3 sampai mendapatkan IP Address Lolin nodeMCU ESP8266 yang berperan sebagai web server.
Dengan menggunakan rangkaian elektrikal yang sama seperti pada langkah 4, kemudian kita akses IP Address web server melalui web browser, jika tidak error maka project akan running seperti video berikut:
Waktu Terbaik untuk Bersedekah:
Jika tutorial ini membantu atau menginspirasi project anda, dan sekiranya anda berkenan untuk mendonasikan sebagian rezeki yang anda miliki
            untuk pembangunan sebuah pesantren di daerah Karawang. Bisa anda donasikan ke nomor rekening di bawah ini: